关于深拷贝和浅拷贝区别:
- 浅拷贝:浅拷贝会在堆上创建一个新的对象(区别于引用拷贝的一点),不过,如果原对象内部的属性是引用类型的话,浅拷贝会直接复制内部对象的引用地址,也就是说拷贝对象和原对象共用同一个内部对象。
- 深拷贝:深拷贝会完全复制整个对象,包括这个对象所包含的内部对象。
上面的结论没有完全理解的话也没关系,我们来看一个具体的案例!
浅拷贝
浅拷贝的示例代码如下,我们这里实现了 Cloneable 接口,并重写了 clone() 方法。
clone() 方法的实现很简单,直接调用的是父类 Object 的 clone() 方法。
1
2
3
4
5
6
7
8
9
10
11
12
13
14
15
16
17
18
19
20
21
22
23
24
25
26
27
28
29
30
31
32
33
34
35
36
37
38
39
40
41
42
43
44
45
| public class ShallowCopy {
public static void main(String[] args) throws CloneNotSupportedException {
Teacher teacher = new Teacher();
teacher.setName("riemann");
teacher.setAge(28);
Student student1 = new Student();
student1.setName("edgar");
student1.setAge(18);
student1.setTeacher(teacher);
Student student2 = (Student) student1.clone();
System.out.println("-------------拷贝后-------------");
System.out.println(student2.getName());
System.out.println(student2.getAge());
System.out.println(student2.getTeacher().getName());
System.out.println(student2.getTeacher().getAge());
System.out.println("-------------修改老师的信息后-------------");
teacher.setName("jack");
System.out.println("student1的teacher为: " + student1.getTeacher().getName());
System.out.println("student2的teacher为: " + student2.getTeacher().getName());
}
}
class Teacher implements Cloneable {
private String name;
private int age;
}
class Student implements Cloneable {
private String name;
private int age;
private Teacher teacher;
public Object clone() throws CloneNotSupportedException {
Object object = super.clone();
return object;
}
}
|
输出结果:
1
2
3
4
5
6
7
8
| -------------拷贝后-------------
edgar
18
riemann
28
-------------修改老师的信息后-------------
student1的teacher为: jack
student2的teacher为: jack
|
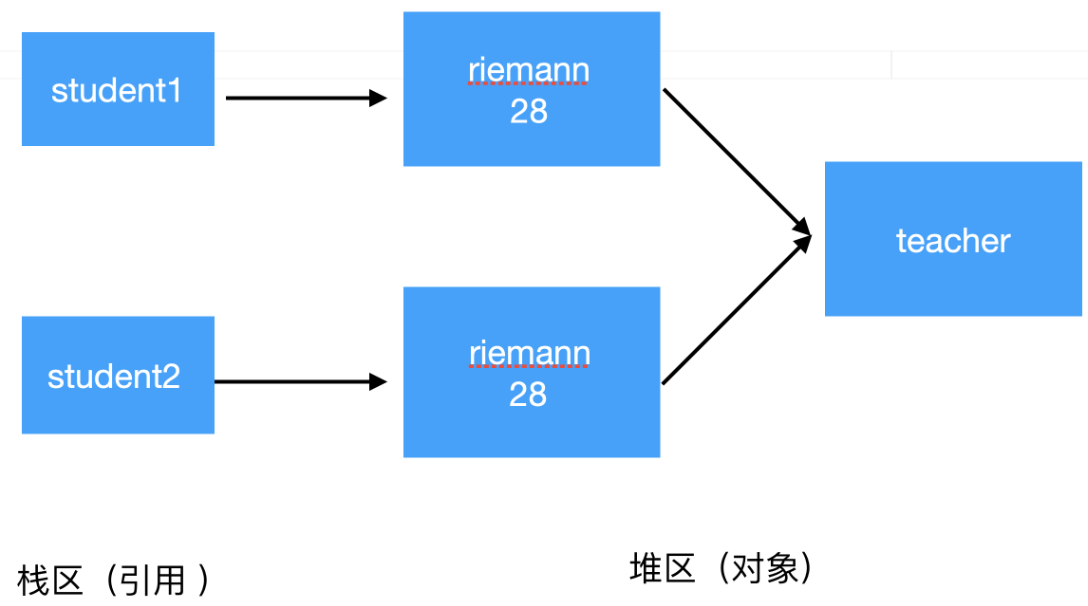
结果分析: 两个引用student1和student2指向不同的两个对象,但是两个引用student1和student2中的两个teacher引用指向的是同一个对象,所以说明是浅拷贝。
深拷贝
这里我们简单对 Person 类的 clone() 方法进行修改,连带着要把 Person 对象内部的 Address 对象一起复制。
1
2
3
4
5
6
7
8
9
10
11
12
13
14
15
16
17
18
19
20
21
22
23
24
25
26
27
28
29
30
31
32
33
34
35
36
37
38
39
40
41
42
43
44
45
46
47
48
49
50
51
52
53
54
| public class ShallowCopy {
public static void main(String[] args) throws CloneNotSupportedException {
Teacher teacher = new Teacher();
teacher.setName("riemann");
teacher.setAge(28);
Student student1 = new Student();
student1.setName("edgar");
student1.setAge(18);
student1.setTeacher(teacher);
Student student2 = (Student) student1.clone();
System.out.println("-------------拷贝后-------------");
System.out.println(student2.getName());
System.out.println(student2.getAge());
System.out.println(student2.getTeacher().getName());
System.out.println(student2.getTeacher().getAge());
System.out.println("-------------修改老师的信息后-------------");
teacher.setName("jack");
System.out.println("student1的teacher为: " + student1.getTeacher().getName());
System.out.println("student2的teacher为: " + student2.getTeacher().getName());
}
}
class Teacher implements Cloneable {
private String name;
private int age;
}
class Student implements Cloneable {
private String name;
private int age;
private Teacher teacher;
public Object clone() throws CloneNotSupportedException {
Student student = (Student) super.clone();
student.setTeacher((Teacher) student.getTeacher().clone());
return student;
}
}
|
输出结果:
1
2
3
4
5
6
7
8
| -------------拷贝后-------------
edgar
18
riemann
28
-------------修改老师的信息后-------------
student1的teacher为: jack
student2的teacher为: riemann
|
结果分析: 两个引用student1和student2指向不同的两个对象,两个引用student1和student2中的两个teacher引用指向的是两个对象,但对teacher对象的修改只能影响student1对象,所以说是深拷贝。
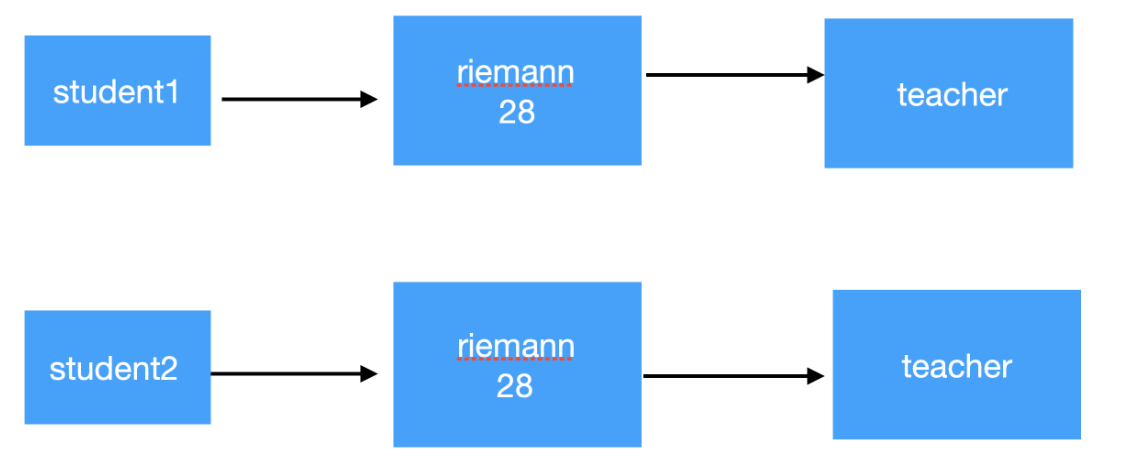
那什么是引用拷贝呢? 简单来说,引用拷贝就是两个不同的引用指向同一个对象。
这里使用一张图来描述浅拷贝、深拷贝、引用拷贝:

怎么实现深拷贝
方法一 构造函数
我们可以通过在调用构造函数进行深拷贝,形参如果是基本类型和字符串则直接赋值,如果是对象则重新new一个。
(创建一个新的对象,将字段一一设置进去,如果是基本数据类型,直接复制;如果是引用类型,创建一个新的对象再设置)
1
2
3
4
5
6
7
8
9
10
11
12
13
14
15
16
| @Test
public void constructorCopy() {
Address address = new Address("杭州", "中国");
User user = new User("大山", address);
User copyUser = new User(user.getName(), new Address(address.getCity(), address.getCountry()));
user.getAddress().setCity("深圳");
assertNotSame(user.getAddress().getCity(), copyUser.getAddress().getCity());
}
|
方法二 重载clone()方法
Object父类有个clone()的拷贝方法,不过它是protected类型的,我们需要重写它并修改为public类型。可以在clone方法中实现自定义的拷贝来实现深拷贝
1
2
3
4
5
6
7
8
9
10
| public class Address implements Cloneable {
private String city;
private String country;
@Override
public Address clone() throws CloneNotSupportedException {
return (Address) super.clone();
}
}
|
1
2
3
4
5
6
7
8
9
10
11
| public class User implements Cloneable {
private String name;
private Address address;
@Override
public User clone() throws CloneNotSupportedException {
User user = (User) super.clone();
user.setAddress(this.address.clone());
return user;
}
}
|
需要注意的是,super.clone()其实是浅拷贝,所以在重写User类的clone()方法时,address对象需要调用address.clone()重新赋值。
方法三 Apache Commons Lang序列化
有一些第三方库可以用来实现深拷贝,例如 Apache Commons Lang 的 BeanUtils.copyProperties() 方法,或者使用 Gson 库进行 JSON 序列化和反序列化。
Java提供了序列化的能力,我们可以先将源对象进行序列化,再反序列化生成拷贝对象。但是,使用序列化的前提是拷贝的类(包括其成员变量)需要实现Serializable接口。Apache Commons Lang包对Java序列化进行了封装,我们可以直接使用它
1
2
3
4
| public class Address implements Serializable {
private String city;
private String country;
}
|
1
2
3
4
| public class User implements Serializable {
private String name;
private Address address;
}
|
测试用例:
1
2
3
4
5
6
7
8
9
10
11
12
13
14
15
16
| @Test
public void serializableCopy() {
Address address = new Address("杭州", "中国");
User user = new User("大山", address);
User copyUser = (User) SerializationUtils.clone(user);
user.getAddress().setCity("深圳");
assertNotSame(user.getAddress().getCity(), copyUser.getAddress().getCity());
}
|


